

SDL
Trados Studio 2015 has just been released. As a beta tester, I’ve been
trying out the new version for a couple of months, reporting bugs,
discussing improvements with the developers and other beta testers, and
enjoying seeing new features in action in real-life projects. Here’s my
account of the new features in Studio 2015.
In this blog post: New features for beginners
- AutoCorrect
- New file type for scanned PDFs
- Autosuggest 2.0
- New bilingual Excel file type
- Symbols, Bookmarks, AnyTM
- Interface languages
In the next blog post: New features for advanced users
- Retrofit
- Ribbon customisation
- New interface
- TQA
- New docx file type
- Misc
- Licensing and upgrading
AutoCorrect
Even if you’ve never used Studio before, you’ll be familiar with the concept because it comes from Microsoft Word.
AutoCorrect will correct your typos, so teh will be quickly replaced by the.
TWo INitial capitals will turn into Two Initial capitals. a forgotten
uppercase at the start of a segment will be automatically capitalised,
and if you leave the cAPS lOCK key on by mistake, Studio will correct it
for you.
To enable these settings, go to File>Options>Editor>AutoCorrect:

You can also add words that you often type incorrectly. The first I
added was “adminsitration”; it’s a word I’ve written wrongly on and off
for about 20 years. How nice to have Studio correct it for me at last.
Don’t forget that you can also use the “replace” box as a shortcut
for commonly-used strings or terms. I’ve added “EMA”, which Studio now
replaces with “European Medicines Agency”.
AutoCorrect settings can be imported and exported as a Studio
.AutoCorrect file. Unfortunately you can’t import your AutoCorrect lists
from Word into Studio or vice versa, because Word stores these lists
separately from the other AutoCorrect settings, as .acl files.
Dragon Naturally Speaking users will be pleased they no longer have
to say “Cap” to capitalise the first letter of every segment. Studio now
autocorrects it as you speak!
A big thank you to SDL for finally listening to its users. (We’ve
been asking for this feature since 2009.) Not only is it better late
than never, AutoCorrect is actually my favourite new feature in Studio
2015. In my opinion, it’s worth buying or upgrading to this version just
for AutoCorrect.
Scanned PDFs
Studio has handled editable PDF files since 2011. Now, it can also process scanned PDFs through the Solid Documents
engine, which carries out optical character recognition (OCR) and
extracts texts from images in the background, before the file is opened
as an .sdlxliff in the Editor.
A good conversion requires a good quality scanned image, so don’t
expect miracles on skewed, blurry scans or text with background noise
(photocopy lines, smudges, stamps on top of text, etc.). The OCR engine
works for these languages: English, Danish, Dutch, Finnish, French,
German, Italian, Norwegian, Polish, Portuguese, Russian, Spanish,
Swedish and Turkish. Also, make sure you adjust some important settings
before you process a scanned PDF, to get the best possible results.
Go to File>Options>File Types>PDF>Converter.

For the Layout option, I recommend Flowing. This is the most
basic output you can get with formatting, including correctly formatted
bullet points, etc., and it provides a starting point for pre-editing
the file in Word (see below).
I remove images, but you may need to keep them and convert them if
possible. Headers and footers are best processed as such, although
sometimes it’s easier to remove them here and add them by hand in the
target Word file.
Detect tables is essential.
The options at the bottom of the pane define how Studio will recognise text.
- Every character. You have to use this for combined PDFs (containing both editable and scanned text).
- Problem character is for scanned PDFs (although you can also use Every character).
- None is for editable PDFs.
After Studio converts your PDF and opens it in the Editor, the next step is to preview the target file in Word, by clicking Ctrl+shift+P. (Alternatively, you can save the source file at this stage.)
- If the output looks OK, then you can translate it as is in Studio.
- If you need to adjust the formatting and word recognition errors, it’s probably more efficient to carry out these corrections in Word, and then open this file in Studio for translation.
The additional capability to process scanned PDFs is very useful for
translators who are just starting out and haven’t built up their full
set of tools yet. More experienced translators will probably already be
using Abbyy FineReader or other OCR programs that have far more advanced editing and dictionary features.
AutoSuggest 2.0
AutoSuggest (AS) has been around for a long time in Studio. It offers
suggestions from a drop-down list as you type, based on translation
memories (TMs) that have been processed and converted into AS
dictionaries. It also gives you suggestions from termbases, autotext
lists and Open Exchange plug-ins. Why is it useful? It saves you typing
long phrases, helps jog your memory and ensures consistency.
Just to clarify, you only need a special AutoSuggest license to create an AS dictionary. All other resources, new and old, pop up even if you don’t have an AS license.
Studio 2015 not only offers suggestions from the above resources, but
now also mines your TM in real time, leveraging 100% and fuzzy matches,
concordance and automated translation providers. The new resources
appear in the drop-down list as you type, preceded by the following
symbols:

To enable AutoSuggest, go to File>Options>Editor>AutoSuggest and tick “Enable AutoSuggest”:

With the introduction of AutoSuggest 2.0, I’ve had to increase the value in Show the suggestions window to 5. I recommend you fine tune this value until it works well for you.
Now, go to File>Options>Editor>AutoSuggest>Translation Memory and Automated Translation and decide which match types to include in AutoSuggest look-up.

Bear in mind that:
- Automated translation only kicks in if there are no other results.
- Concordance matches only returns suggestions from automatic concordance look-up, not from a manual search using F3. If you enable this option, Studio will automatically turn on Options>Editor>Concordance Search Window>Perform search if the TM lookup returns no results.
- Minimum suggestion length is set to 1 word by default. I changed this to 2 to make suggestions more productive for me.
- Minimum number of characters typed before displaying suggestions is set to 3 by default. I changed this to 2 because I seem to get almost the same results after typing 2 characters. Again, it’s definitely worth experimenting with these values.
Note that the new look-up resources only work the first time you
enter a segment. If you leave the segment and return, the suggestions
don’t appear again!
Do you still need an AS dictionary?
Now that we have new AutoSuggest resources, you may wonder whether
it’s still worth building AutoSuggest dictionaries, especially as you
need a TM with 10,000 units and a separate license to do so. I think
it’s still worth it. AutoSuggest dictionaries make highly accurate,
relevant suggestions as you type. The new resources are a brilliant
complement to these dictionaries.
Bilingual Excel file type
It’s quite common to receive an Excel file that has the source text
in one column and instructions to translate the content in the next
column. Before the bilingual Excel file type was introduced in Studio
2015, you had to copy the source text, paste it in the neighbouring
column and then hide the first column. Now, you can specify which column
is which.
To do this, select the bilingual Excel file type in File>Options>File Types. If you can’t see it in the list on the right, click on Additional installed File Types exist.
Move the Bilingual Excel file type above the other Excel file types in
the list, to make sure Studio finds it first. You may prefer to do this
just for a specific project rather than in your general settings.

Under Common (see screenshot below), specify your source and
target columns. If you have any comments in the file, specify which
column they’re in. Unfortunately, Studio will only add them at a
paragraph level in the sdlxliff file, so they won’t be highlighted in
the Editor and you’ll only be able to see them in the Comments’ pane.

Formatting is preserved at cell level if you disable Preserve Target Style,
but formatting of individual words will be ignored. So if you have an
Excel file with a lot of bold, italics, etc., I suggest you use the old
file type instead, with the workaround mentioned above.
Open Exchange apps in the core product
These three apps are now installed automatically with Studio:
Symbols
The new symbols feature is on the Advanced tab. After you’ve
inserted a symbol, it appears alongside the icon on the ribbon. You can
add up to 9 quick access symbols to the ribbon this way. (See α and β
in the screenshot below.)

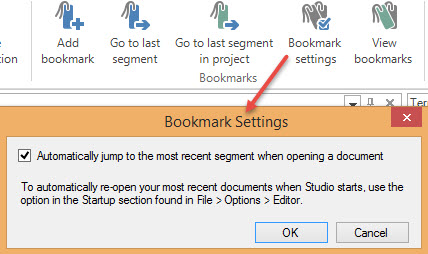
Bookmarks
Find your bookmark settings on the Home tab when you’re in the Projects or Files view, or on the Advanced tab when you’re in the Editor.
Bookmarks are automatically added to the last segment you access in a
document and in a project, and you can add your own bookmarks with
comments. I find this useful when I translate a long document and check
sections of my work before going on. I then add a bookmark and a comment
with the word count at that point.
You can also set Studio to re-open your document at the last accessed segment.
AnyTM
AnyTM will let you use TMs with different languages, different
language variants and reversed language direction in the same project.
To add these TMs to general options, go to File>Options>Language Pairs>Translation Memory and Automated Translation. In the right-hand pane, click Add and select AnyTM.

With the AnyTM mixed-source language translation button
enabled (see screenshot in the Symbols section above), Studio will also
detect the language of each source segment and look up translations in
the corresponding TM language.
In or out of the box?
Symbols, Bookmarks and AnyTM have been available on the Open Exchange
as plug-ins for several years now. So why are they built into Studio
now?
First, they’re among the most popular apps because they receive the
most downloads. So now, whenever a new Studio version comes out or you
change to a new work machine, you don’t have to spend time downloading
and installing these apps one by one.
Second, a surprisingly large number of Studio users have never
visited the Open Exchange or installed any apps. By bringing the most
popular apps into the core product, all users, especially beginners,
will be sure to have access to these useful features.
So, although these features aren’t new in Studio 2015, they’re good
news for everyone: installation is faster for power users and
productivity is improved for new users.
Interface languages
I’m always surprised that translators’ tools aren’t available in
scores of languages. After all, developers have access to excellent
localisation software and top-notch translators. With Studio 2015, SDL
has added two more interface languages, Italian and Russian, and
apparently Korean is in the pipeline.
To change your interface language, go to the View tab from any window and select User Interface Language.

I hope this post helps newish users decide whether they want to
upgrade to Studio 2015 and encourage complete beginners to take the
plunge. Stay posted for a follow-up article on new features for advanced
users. Coming soon to a blog near you!
No comments:
Post a Comment